Instagram

Monday 27 January 2014

Pucker Up!


If there was one thing I could rescue from my house if it was burning down, it would be a red lipstick. I can't leave the house without it! All women look beautiful with it and I have done this blog post to show you a range of my collection at different prices!
Apologies for inconsistent lighting, but I have chosen flash/no flash depending on what shows the colour best!

MUA - Shade 1
To start with, the cheapest! This is by MUA and is shade 1. It is glossy to start with but throughout the day I find it sets more and has a 'matte' look. Before getting really into make up I used to wear this all the time. I love the colour as it has a rich purpley tint to it making it different from your average red. I wear this with darker clothing like blacks, greens and purples. The lipstick is quite staining to the lips making it long lasting! And the best part, it is only £1!

Mac - Ruby Woo
Now, this is a favourite with a lot of vintage and retro gals! Yes, it's the one and only Ruby Woo by Mac. I LOVE this lipstick, it is an amazing colour that really just slaps you in the face. I wear this with lighter colours like blues and pinks. To enhance the shape of my lips I use Cherry lip liner also by Mac with this lipstick. What I would suggest with this lipstick, and with all their matte finishes, is to completely remove the lipstick and re-apply when you want to touch it up. This is because it can dry your lips out and make them peel! This must need lipstick comes to a price of £15... Not too shabby!

Chanel - Incandescent
I was treated by my lovely boyfriend at Christmas to this gorgeous lipstick by Chanel, shade Incandescent. This is part of the Rouge Allure range and are described as 'luminous intense lip colour'. This has a more orangey tint to it which works amazingly with the satin finish. I also line this with Cherry and like to wear yellows, oranges and reds with this. For £25 you are paying mainly for the brand, but I think the money is so worth it as it is just so divine!


Betsy Jo

x

Monday 20 January 2014

Chocolate Cupcakes


I know that chocolate cupcakes aren't the most unique cakes, but I have tried many, many different recipes and this is the one that really delivers the most yummy results!

Ingredients:
Cupcakes (serves 12 lucky people)

  • 175g of Self Raising Flour
  • 175g of Light Brown Sugar
  • 175g of Butter (I usually use Stork)
  • 4 Eggs (small)
  • 80g of Cocoa Powder
  • Tsp of Baking Powder
  • Hot Water
  • Dash of Milk
  • Pinch of Salt

Butter cream
  • 300g of Icing Sugar
  • 150g of Butter
  • 50g of Cocoa Powder
  • Dash of Milk


When combining your ingredients, make sure to use a metal whisk, as the silicone ones you can get sometimes restrict your speed!
Preheat your oven to 180°c.
Weigh out the cocoa powder and put it into your mixing bowl. Add the hot (boiling hot) water, I haven't put a measurement for this, because you just need to add it in little amounts until it creates a runny paste with the powder. Now, get the butter and break off small chunks to add to the mixture. The butter will then melt into the mixture and make it super easy to combine!
Once you have done this, add the light brown sugar and eggs and combine. I much prefer to use light brown sugar than caster sugar, it makes it more rich in flavour. 


Put the teaspoon of baking powder in, mix well, and now you're ready to put the flour in. Do this in two half amounts, whisking lots and lots after each. Then, to just loosen the mixture a bit add a tiny dash of milk.
Last ingredient, a pinch of salt to enhance all the yummy flavours!

Make sure your mixture is super smooth, no lumps!


The fun part - spoon the mixture into the cupcake cases. I add quite a lot, as I like my cakes big!
Put in the oven for 20 minutes at 180°c.
Take them out and leave them to cool, meanwhile you can make the butter cream!


For this you will need an electric hand mixer.
Pour the icing sugar over the butter in the bowl. Initially put 100 grams of butter in and combine. This will make a mixture that looks a but like scrambled egg (second photo)! Then add the rest of the butter and the cocoa powder. To make it a little creamier then use a dash of milk!


Give it a taste for good measure!


Make sure your cupcakes are completely cool before 
you decorate!
Fill a piping bag with the butter cream using a star shaped nozzle. Use a spiral shape motion to decorate the cupcake to get the above effect. Then grate white chocolate over the top to get the completed product!
Enjoy!


Betsy Jo

x

Bumper Bangs


Polka dot crazy
If in doubt, pout

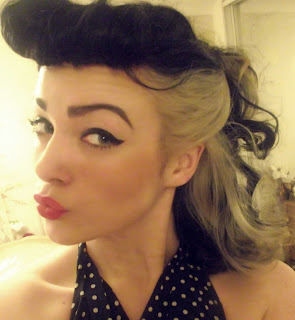
Bumper bangs is my favourite vintage hair style to do, and once you get the hang of it, it is super easy! What is great about this style is that it can create a range of different looks and is suitable for a quick up do, with vintage curls, or even straight hair! In this post I am showing you how to do vintage curls as well as the bumper bang itself. My recommendation is to do this with dirtiest hair as possible as it makes it easier to style. I only wash my hair once a week and don't do much styling until the second day after washing.

For this occasion I styled my hair using tongs. The tongs I use are made by Nicki Clarke and have a 19mm barrel (price around £19.99). Sometimes I will do a wet set using sponge rollers and leave it over night but I find using heat enables me to structure my curls better.
Using heat protection is essential to try prevent damaging hair, and my favourite heat protector is by Trevor Sorbie, called Curl Creator. It acts as a hair spray too. It creates long lasting curls and I spray it on before and after styling my hair. And it smells fruitilicious! 
Three different hair brushes are used when doing this style, the thick bristled brush, rounded hair brush and a smoothing comb.


Firstly, section off the front of your hair that you want to use for the bumper bang, this needs to be quite thick and neat. If you have a fringe don't worry, this can be incorporated into the style (I am growing out a front fringe at the moment).


For the pin curls, I use medium sized sections of my hair, but it is entirely up to you how big you want your curls. I have to do a few as I have layers in my hair and it is quite thick. Spray the section of hair with the Curl Creator spray, or the heat protector of your choice and roll inwards towards your face (be careful not to burn yourself!). The curl will then need rolling into a small spiral then pinned into place. Repeat this until all the hair is pin curled! 
Take the hair you initially sectioned off and do the same. I do two pin curls here, the first being the longer part of my hair and the second being my grown out fringe.


Leave the hair to cool for as long as you can. I recommend at least half an hour as it can affect the shape of your curl and also how long they will last. I usually set my hair, then do my make up. Spritz the hair with Curl Creator or hairspray and remove the pins. Use a thick bristled brush to brush out the curls and they should spring up as shown in the second photo!


Now finally on to the bumper bang! Take the front section of hair out of it's pin curls and back comb... A lot! I do this using a smoothing comb as it creates a great texture to work with. Then spray it with hairspray and smooth it out again using a smoothing comb. Take the rounded brush and brush underneath, wrap the end of the section of hair around your finger and roll upwards. Grip it in the middle first, then the other sections of the bumper bang until it feels secure making sure the grips are hidden.


Carefully spread out the hair to the desired shape and then position grips directly on top of the head creating more of a 'U' shape.
Finally spritz one more time with Curl Creator or hairspray and you are done! Put the sides up or even add a bow (as shown above).


Betsy Jo 

x

Collectif Clothing Review


Since I have taken an interest in the 1950's fashion, Collectif is one of my favourite vintage inspired retailers that I have found. Their clothing ranges from the 40's to 50's eras and for how beautiful and good quality the products are they are very reasonably priced. And it's not just the clothing I like, but the customer service they deliver is always outstanding!

 Freddie Knitted Top in Blush - £34.50

So, last year I was lucky enough to visit their store in Camden! This is where I chose the Freddie Knitted Top in Blush out of the seven divine colours they offer. The material is so soft and can be worn casually or you can dress it up! Also, the pearl look buttons just make it that little bit more cute.
My usual size is a 10, but I bought the top in a size 8 and it fits perfectly.

Liesel Polka Dot Skirt - £46.25 (sale price £23.25), Shoes - Charity Shop

Now, another thing that makes Collectif fabulous is they have amazing sales. For their after Christmas sale they were offering 50% off EVERYTHING! Obviously, I couldn't resist, and ordered the Liesel Polka Dot Skirt in navy. Navy is one of my favourite colours and I knew it would go perfectly with my top. I love the straps as it makes it that bit more unique, but they can be removed so if you want it as a normal circle skirt, you can! 

Annette Cape - £37.50 (Now in sale section for £10)

I didn't stop there, and also ordered the Annette Cape in navy. This was already in the sale section for £20, so I got it for £10! This is more ideal for the  spring/summer as a light cover up, but whilst shooting these photos in the freezing cold, it was keeping me quite warm!
I did also order the Freddie Knitted Top in Navy, but unfortunately it had to be cancelled as of no stock. Collectif refunded me the full original price of £34.50 on to a gift card, so I went back and ordered it in Antique Green. They even gave me a code for free delivery!


Betsy Jo

 x

Instagram